Featured Post

Featured

Vishesh Auto Index 5 Features,Changelog & Download

A mobile focused autoindex script that allows users to create a mobile download site. Vishesh Auto Index 5 specially made for mp3 downloa...


Block Ads (Google Ads & Other 3rd Party)

Block Ads (Google Ads & Other 3rd Party)


 Hello Friends, After a long time I created a post that's too much helpful to you.

I noticed many websites and apps shows too many ads like e.g.:- Google Ads & Other 3rd party ads. These ads irritate us and consume our too much mobile data because many advertising providers show Reward Video Ads.


Can we get rid from these ads?

Yes, We can get rid from these ads by using Private DNS.

What is Private DNS?

Private DNS is also a great alternate to get rid of annoying advertisement, online tracking, protect your data from piracy. Private DNS on Android uses the TLS protocol, such as HTTPS. The encryption provided by Transport Layer Security (TLS) eliminates opportunities for eavesdropping and tampering with DNS queries on the network.

With the Private DNS option, you can set a DNS server for all of your Wi-Fi and Mobile networks in one place rather than changing it one by one for each.


How to Setup Private DNS?

Steps to Setup Private DNS.

  • Go to Settings.
  • Select Connection & Sharing.
  • Select Private DNS.
  • Then Choose Designated DNS.
  • And Enter dns.adguard.com
  • Then Save it. 
  • Enjoy Ad free Web Browsing.


How to add Auto Source link

How to add Auto Source link


Hello friends, I noticed on Internet many people (blogger/webmaster) copy content from another website and publish on their blogs/websites.

If a blogger/webmaster copy your content then automatically a source link is also copied with this text. I know this method is too old but I'm facing this problem because too many blogger copy text from my another blog.

How to Add Automatic Source Code Link?

  • Go to Blogger.
  • Click on Themes.
  • Click on Edit HTML.
  • Find </body>.
  • Paste the code before </body>.

<script type='text/javascript'>
//<![CDATA[
!function(e,t)
{var n="getSelection",o="removeAllRanges",i="addRange",l="parentNode",a="firstChild",d="appendChild",r="removeChild",s="test",c="innerHTML";if(e[n])
{var p,g,f,h,u,y;t.addEventListener("copy",function(C){for(g=C.target;3===g.nodeType;)g=g[l];
if(h=t.createElement("div"),(p=e[n]())&&p.rangeCount&&(p=p.getRangeAt(0))&&(f=p.cloneRange(),p=p.cloneContents())){for(;u=p[a];)h[d](u);if(!/^(pre|code)$/i[s](g.nodeName||"")&&!/(^|\s)no-attribution(\s|$)/i[s](g.className||""))
{var v=e.location.href;h[c]+="<br><br>&copy; "+t.title+'<br>Source: <a href="'+v+'">'+v+"</a>"}
y=t.createRange(),t.body[d](h),y.selectNodeContents(h),p=e[n](),p[o](),p[i](y),setTimeout(function()
{h[l][r](h),p[o](),p[i](f)})}},!1)}}(window,document);
//]]>
</script>
  
Live Preview
See it live with all the features that exist, both on the homepage and the page posts.


Footer Credit EditedWith All featuresRemoved Redirect JavaScriptFor Unlimited DomainsUnlimited Page NumberedAnd Many More...
Alternate for Google Photos with Unlimited Backup

Alternate for Google Photos with Unlimited Backup

Alternate for Google Photos with Unlimited space Backup

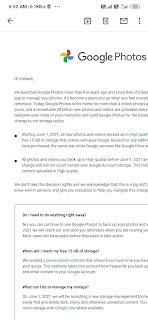
 Hello Everyone, After a long time a create a new post. In this post i tell Alternate for Google Photos with Unlimited Backup(in high quality). Because Recently Google photos changed their policy regarding storage use. Then, After 1June,2021 you can use only 15GB free space on Google account.

Also Check:- Invert Pro Latest Version Blogger Template Download Free (Premium Version) 


Screenshot regarding policy change

What is alternate for Google photos with unlimited backup storage ?

Here I suggest about Yandex Disk because this app provides unlimited space for backup(only in high quality not in original quality). 


What is Yandex Disk (About Yandex Disk) ?

Yandex.Disk is a free cloud storage service that gives you access to your photos, videos and documents from any internet-enabled device. Download the app to your phone or tablet and you'll literally be able to carry your files with you everywhere.

Yandex Disk Features:-

  • Transfer data from your cell phone to computer and back again, all you need is an internet connection.
  • Your files will be completely safe on Disk, even if your mobile or tablet gets lost or broken.
  • To share a file or folder, simply send a link to it and save on mobile data charges.
  • Photos taken through the app will be instantly available on all your other devices.
  • Inbuilt Fingerprint/PIN lock.
  • And much more.

Disadvantages of Yandex Disk:-

  • Annoying Ads(but in limit).
  • Only 10GB on Disk for free(High Quality Photos). But it's not enough.

For Use Yandex Disk you should have Yandex Account.

Screenshot of Yandex Disk


About Yandex Company:-

Yandex is a Russian company. And it's fully secure. Yandex have their own search engine like Google. Know more about Yandex Click Here.


Generating Download Page
How to remove "?m=1" from blogger

How to remove "?m=1" from blogger

How to remove "?m=1" from blogger blog

 Hello friends, 

After a month I'm sharing on my blog. How to remove "?m=1" from blogger blog.

Because if we create blog using Google blogger then we get m=1 with blog address.

So here you can say good bye to this tag "m=1".

Just copy the below highlighted code and paste it on your blog template.


Also Check: How to type English to Telugu 


How to hide "m=1"?

  1. Go to blogger.
  2. Now go to Template section
  3. Click on edit HTML.
  4. Search </body> and paste the below code before <body>.
  5. Save the theme. And say goodbye with this annoying tag.


<script type='text/javascript'>  

 //<![CDATA[  

 var uri = window.location.toString();  

 if (uri.indexOf("%3D","%3D") > 0) {  

 var clean_uri = uri.substring(0, uri.indexOf("%3D"));  

 window.history.replaceState({}, document.title, clean_uri);  

 }  

 var uri = window.location.toString();  

 if (uri.indexOf("%3D%3D","%3D%3D") > 0) {  

 var clean_uri = uri.substring(0, uri.indexOf("%3D%3D"));  

 window.history.replaceState({}, document.title, clean_uri);  

 }  

 var uri = window.location.toString();  

 if (uri.indexOf("&m=1","&m=1") > 0) {  

 var clean_uri = uri.substring(0, uri.indexOf("&m=1"));  

 window.history.replaceState({}, document.title, clean_uri);  

 }  

var uri = window.location.toString();  

 if (uri.indexOf("?m=1","?m=1") > 0) {  

 var clean_uri = uri.substring(0, uri.indexOf("?m=1"));  

 window.history.replaceState({}, document.title, clean_uri);  

 }  

 //]]>  

 </script>

I redesign a blogger template and use this code for remove m=1. You can check it.
Voice To Text converter (HTML/JavaScript)

Voice To Text converter (HTML/JavaScript)

Create Voice To Text converter with HTML and JavaScript
Hello friends, Today i'm sharing "How to create Voice To Text converter with HTML and JavaScript?"
If you are a webmaster or blogger then you can create this tool on your website/blog.
For create voice to text converter, create a new page and follow this tutorial.


  • Create a plain html page or for blogger create a new page.
  • Add HTML for this tool.

<div class="words" contenteditable>
</div>


  • After HTML add CSS for this tool.
<style>@import url("https://fonts.googleapis.com/css?family=Open+Sans");

html {
  font-size: 10px;
}

body {
  background: #fce6d3;
  font-family: "Open Sans", sans-serif;
  font-size: 2rem;
  color: #1d2e4b;
}

.words {
  max-width: 500px;
  margin: 50px auto;
  background: #fff;
  border-radius: 5px;
  padding: 1rem 2rem 1rem 5rem;
  background: -webkit-gradient(linear, 0 0, 0 100%, from(#cfddf9), color-stop(4%, #fff)) 0 4px;
  background-size: 100% 3rem;
  position: relative;
  line-height: 3rem;
  -moz-box-shadow: 2px 8px 15px rgba(228, 126, 118, 0.5);
  -webkit-box-shadow: 2px 8px 15px rgba(228, 126, 118, 0.5);
  box-shadow: 2px 8px 15px rgba(228, 126, 118, 0.5);
}

p {
  margin: 0 0 3rem;
}

.words:before {
  content: "";
  position: absolute;
  width: 4px;
  top: 0;
  left: 30px;
  bottom: 0;
  border: 1px solid;
  border-color: transparent #ffd9d9;
}</style>


  • Add JavaScript code for this tool
<script>
window.SpeechRecognition = window.SpeechRecognition || window.webkitSpeechRecognition;

if (!window.SpeechRecognition) {
  alert("Your browser does not support speech recognition. Use Chrome!")
}

const recognition = new SpeechRecognition();
recognition.interimResults = true;

let p = document.createElement('p');
const words = document.querySelector('.words');
words.appendChild(p);

recognition.addEventListener('result', e => {
  const transcript = Array.from(e.results)
    .map(result => result[0])
    .map(result => result.transcript)
    .join('');

    p.textContent = transcript;

    if(e.results[0].isFinal) {
      p = document.createElement('p');
      words.appendChild(p);
    }

  console.log(transcript);
});


recognition.addEventListener('end', recognition.start);
recognition.start();</script>

  • Now your tool is ready.
GCam stable for Realme Narzo10A/C3

GCam stable for Realme Narzo10A/C3

Google Camera fully stable for Realme Narzo10A/Realme C3
Hello friends, Today in this i'm sharing "Google Camera fully stable for Realme Narzo10A/Realme C3". Because i'm using Realme Narzo 10A. It's stock camera is fully worst app. So after too much trying Google camera mods apps but now I get a Google Camera mod app which fully stable.

Follow this steps to Run Google Camera into your Realme Narzo 10A/Realme c3.


Whats is Google Camera?

Google Camera (Gcam) is a camera phone application developed by Google for Android. Google Camera development began in 2011 by X, led by Marc Levoy, developing image fusion technology for Google Glass.[1] It was initially supported on all devices running Android 4.4 KitKat and higher, but is now only officially supported on Google's Pixel devices.

But after mod of Google camera we can run this App on any andriod mobile(Andriod Version8+).

What is Google Camera Mod?

Google Camera Mod is andriod app, having same features of official camera app. But sometimes we find some bugs and lacks in it. But it capture better picture with much details.


Generating Download Page
After download this camera apk. Now download this config file for make camera stability.
About config files:-
Different phones may need different settings. Some GCam versions support .xml config files, allowing users to quickly import (load) and export settings.

Steps:- How to Config this Google camera? 

  • Go to File manager.
  • Create new folder named GCam.
  • Click on GCam folder and in this folder create a new folder named "onfire".
  • Now click on onfire folder and here create new folder named "Configs7".
  • Click on this created folder and paste the downloaded config file.
Note: Configs are stored in the GCam/onfire/Configs7

Create Sitemap with Drop-down list (blogger)

Create Sitemap with Drop-down list (blogger)

How to create Sitemap with Drop-down list in blogger (Visheshgrewal.blogspot.com)
Hello My friends! In this post i'm sharing you How to create Sitemap with Drop-down list in blogger. Because sitemap is important in SEO for give better search results of your site/blog.
I'm sharing code for sitemap who create sitemap of your blogger blog with Drop-down list.

How to create Drop-down sitemap?

    • Login to your blogger Account.
    • Select your blog.
    • Now go to Pages section.
    • Create new page.
    • Enter the name of page.
    • Paste the copied code and click on publish.
    Note:- After copy this code, Please change your blog address with https://visheshgrewal.blogspot.com
    YouTube Now Allows You To Watch Videos In 1080p...

    YouTube Now Allows You To Watch Videos In 1080p...

    YouTube Now Allows You To Watch Videos In 1080p After 4 months ago, YouTube has maid some restrictions on its video streaming services by cutting down the quality to 480p across every network.
    And finally, Now Indian's can now watch the videos in 1080p but user's can only watch the videos at 1080p quality only when connected to WiFi network which clearly states that the mobile streaming is still limited to SD quality.

    Few users might still cannot be able to watch the videos on high quality as the changes are occurring via a server-side switch rather than an app update. And it's clear that all the YouTube user's can watch the videos on high quality and this is not limited to premium user's of YouTube. We might see few more changes in upcoming weeks which might also bring better quality of video for mobile streaming as per experts.

    Now, Depending upon the quality of a video, user's will now able to see higher quality settings which features 144p, 240p, 360p, 480, 720p, and 1080p which were removed in recent months due to COVID-19 pandemic lockdown globally in many countries to save bandwidth. As seen in the image above, now you can toggle between your desired video quality from HD, full-HD, and also in higher quality by connecting to WiFi network, but once you switch to mobile data the quality of video will automatically change to 480p only decreasing the quality of video and limiting it to SD again.

    Google Camera official Version mod for all andriod

    Google Camera official Version mod for all andriod


    Whats is Google Camera?

    Google Camera (Gcam) is a camera phone application developed by Google for Android. Google Camera development began in 2011 by X, led by Marc Levoy, developing image fusion technology for Google Glass.[1] It was initially supported on all devices running Android 4.4 KitKat and higher, but is now only officially supported on Google's Pixel devices.
    But after mod of Google camera we can run this App on any andriod mobile(Andriod Version8+).

    What is Google Camera Mod?

    Google Camera Mod is andriod app, having same features of official camera app. But sometimes we find some bugs and lacks in it. But it capture better picture with much details.

    Features of Google Camera:-

    • HDR+ with dual exposure controls – Take pictures using HDR+ to capture fantastic photos, especially in low-light or backlit scenes.
    • Night Sight – You’ll never want to use your flash again. Night Sight brings out all the best details and colors that get lost in the dark. You can even take photos of the Milky Way!
    • Super Res Zoom – Super Res Zoom keeps your pictures sharp when you zoom in—without the blur.
    • Top Shot – Pick the perfect moment with Top Shot. Automatically recommends the best pics, where no one is blinking and everything looks just right.
    • Portrait – Add elegant background blur (bokeh) to pictures. Google Photos can also make the subject of your photo pop by leaving them in color, while changing the background to black and white.
    • Google Lens Suggestions – Point your camera at QR codes, business cards, paper documents, or foreign text and it’ll help you read, scan documents, translate, and more.
    • Playground – Have fun mixing the real world with the virtual through AR stickers and effects!
    • Lens Blur - Google camera have lens Blur features for focusing on macro things like; flower, bee, bettles.

    Some Picture Samples of Google Camera:-


    Generating Download Link
    Simple and Responsive Login Form without Framework

    Simple and Responsive Login Form without Framework

    Create Simple and Responsive Login Form without Framework using HTML and CSS by Vishesh Grewal
    Here In this post I share you

    How to create Login Form? [Simple, Responsive, Mobile Friendly]

    Creating a Login Form is so simple. I share you source code for Login Form.

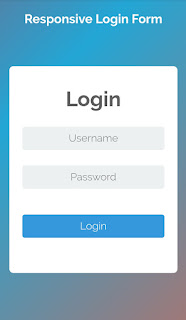
    Here is demo of Login Form:-

    1. First Create a HTML page on your server. 
    2. Add CSS for login form.
      Style for CSS is below, copy and paste this code.
    3. 
      @import url('https://fonts.googleapis.com/css?family=Raleway:300,400,700');
      
      *{
        margin: 0;
        padding: 0;
        outline: none;
        box-sizing: border-box;
        font-family: 'Raleway', sans-serif;
      }
      
      body {background: linear-gradient(-45deg, #ee7752, #ff5530, #23a6d5, #ff0000);
       background-size: 400% 400%;
       -webkit-animation: gradient 15s ease infinite;
               animation: gradient 15s ease infinite;
      }
      
      @-webkit-keyframes gradient {
       0% {
        background-position: 0% 50%;
       }
       50% {
        background-position: 100% 50%;
       }
       100% {
        background-position: 0% 50%;
       }
      }
      
      @keyframes gradient {
       0% {
        background-position: 0% 50%;
       }
       50% {
        background-position: 100% 50%;
       }
       100% {
        background-position: 0% 50%;
       }
      }
      
      .cont{
        position: relative;
        width: 25%;
        height: 400px;
        padding: 10px 25px;
        margin: 10vh auto;
        background: #fff;
        border-radius: 8px;
      }
      
      .form{ width: 100%; height: 100%; }
      
      h1, h2, .user, .pass{ 
        text-align: center;
        display: block;
      }
      
      h1{ 
        color: #606060;
        font-weight: bold;
        font-size: 40px;
        margin: 30px auto;
      }
      
      .user, .pass, .login{
        width: 100%;
        height: 45px;
        border: none;
        border-radius: 5px;
        font-size: 20px;
        font-weight: lighter;
        margin-bottom: 30px;
      }
      
      .user, .pass{ background: #ecf0f1; }
      
      .login{
        color: #fff;
        cursor: pointer;
        margin-top: 20px;
        background: #3598dc;
        transition: background 0.4s ease;
      }
      
      .login:hover{ background: #3570dc; }
      
      @media only screen and (min-width : 280px) {
        .cont{ width: 90% }
      }
      
      @media only screen and (min-width : 480px) {
        .cont{ width: 60% }
      }
      
      @media only screen and (min-width : 768px) {
        .cont{ width: 40% }
      }
      
      @media only screen and (min-width : 992px) {
        .cont{ width: 30% }
      }
      
      h2{ color: #fff; margin-top: 25px; }
       
  • Add HTML for Login Form. 

  • Copy and paste this code.

    
    <h2> Responsive Login Form</h2>
    <div class="cont">
    <div class="form">
    <form action="">
          <h1>
    Login</h1>
    <input type="text"
                 class="user"
                 placeholder="Username"/>
          <input type="password" 
                 class="pass"
                 placeholder="Password"/>
          <button class="login">Login</button>
        </form>
      </div>
    </div>